2
Start out with the torso and head. Drawing most animals is easier if you start with the less dynamic parts. So, try not to start with the legs!
3
Alright, here we start adding limbs and getting a feel for the horse. Notice how the tilt of the body is already apparent. Don't start worrying about getting the anatomy perfect yet! Just get a basic idea of a horse on paper.
4
Alright take notice on this step of the lack of straight lines. EVERY line on this horse has to be curved in some way in the end. Also study the major bulges and curves in the legs, on the chest, the back, and along the neck. If you want to make your
5
Alright, now that our basic anatomy is out of the way we can move on to the fun part: shading!! Just hatch in some lines with the horse's outline then blend with a tortillion.
6
Now use you eraser to "add" light to the picture. Notice that the lighting is coming from the top left of the picture. This means that there can't be to much lighting on the horse's right side because, well, that is where the shadows will have to be!
7
Here is the close up of the neck and head. This is where you start to develop the horse's mane. Don't forget to add those shadows between the mane and the neck.
8
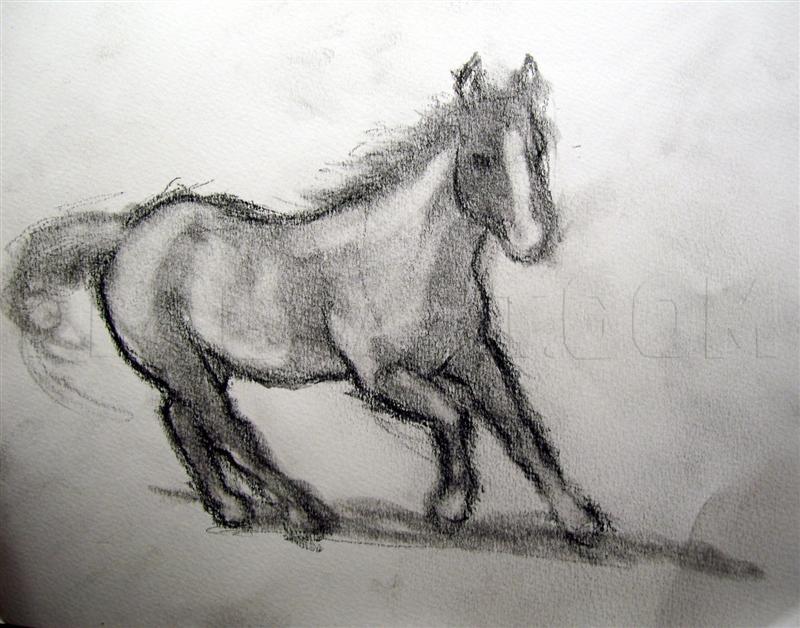
Now we can start adding shadows all around the horse.I started at the neck and worked my way clockwise to the legs. Also, notice in this steps and the ones following how I continuously define the legs more. The curves in the legs are the most difficu
9
Here is the result of the previous steps. Notice the basic work on the tail as well as the fuzzy greyness that is now surrounding our horse. The area around the horse should naturally smudge but if it doesn't use a tortillion to do so.
Comments 0
Details
October 12, 2010
Description: Here is a horse tutorial for one of my friend's birthday. It is pretty short and sweet. I suggest trying to redraw all of the steps as I have to get the most out of it!


