1
Start off with a simple skeleton structure as a base drawing. The torso is very rectangular, as we're going for a somewhat sleek version of the character.

2
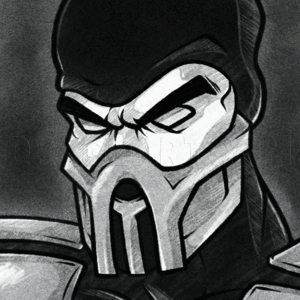
Lighten up your guide lines and begin drawing the skull mask. I like to work outward from the center of the head. Most artists would probably say that's a bad idea, but I think it works here. Align the eye sockets to the guide lines. Then drop in the

3
Here we want to outline the bony shapes of the skull mask. Begin with the inner eyebrows and the curves of the upper jaw. Then fill in the outer eyebrow ridges and finally the cheekbones.

4
Now we can draw in Shao Khan's lower jaw area. Try to define the different layers of the face, with the chin in front. Detail the divot below the bottom lip, and we'll also add a little dimple in the chin to make him cute.

5
Now for the actual helmet... Begin by drawing the ornamental crest on the front of the helmet, just above the skull mask. This is a basic W or trident shape, with the larger points flared out to the sides.

6
Outlining the front shape of the helmet.

7
Here we'll add a metal rim to the shapes of the helmet, and some detail within the metal crest. This is the minimum amount of detail required to bring these shapes to life. Anything less would look extremely flat and uninteresting (in my personal opi

8
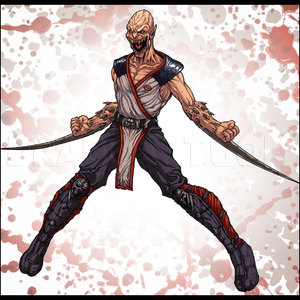
Draw the muscles of the neck coming down and meeting between the top of the pectoral muscles. Add the slope of the trapezius on both sides of the neck.

9
For the shoulder armor, we'll draw three bony panels overlapping each other above each shoulder. These are almost like roof shingles.

10
Add a metal rim to each armor panel, and then draw a spike protruding from each panel. Shao Khan loves wearing spikes. Sometimes the game designs are overdone with spikes, so I think we'll let this be enough for now.

11
I'm going to speed things up a bit here. Draw a shield in the center of the chest, and a pair of straps forming an X across the entire upper chest. Once the basic shapes are down, add seam lines to the straps and draw a skull design embossed on the s

12
With the straps drawn in, we can start drawing the lines of the torso underneath.

13
Using the guide lines, draw in a belt with a large, circular buckle. Add an armor panel to each hip. Once the basic shapes are drawn, add a rim to each armor panel, seams and wrinkles to the belt, and a skull design to the buckle.

14
Draw in the upper arms. In this relaxed pose, the muscles don't have to bulge out. Use smooth curves to add simple muscle definition.

15
Draw an arm guard for each forearm, with a smaller panel covering the back of each hand. Add a rim to each panel. Then draw fabric wrapping around the underside of each forearm. One arm is pointing toward us, and the other away from us. Note the curv

16
Now we'll draw in the hands. Look at your own hands for reference. Feel free to turn the image to any angle in order to draw the hands. We'll go ahead and add some more straps to the shoulder pads here.

17
Time to draw the loin cloth. Rather than just having it hang there like a boring rectangle, draw it blowing in the wind. I've added torn edges and holes to make the shape more interesting.

18
Star the leg with a circular kneepad, and add armor panels descending down the leg, ending at the ankle.

19
Draw in the foot. Shao Khan has a number of different shoe and boot designs. Here I went with a softer, ninja-like foot wrapping.

20
Now draw in the muscles of the upper leg. Don't forget the wrestler-style trunks for modesty!

21
Draw in the second leg at a different angle, behind the front leg. Shao Khan could be taking a casual stroll here.

22
You could leave the drawing as-is and just add some eyes... or you could go nutty, adding all sorts of detail wherever you want it. I added textures to the fabrics, shine to the metal bits, and finer details over the bare body.

23
The finished line art. Before you call it finished, look over the entire drawing and erase any overlapping lines or other eyesores.

24
...and here's the fully-colored image. I hope you guys enjoyed this tutorial. I'd like to revisit this character in the future, but I'll be tackling some different Mortal Kombat characters first, along with some characters from other fighting games.
Comments 0
Details
September 8, 2011
Description: In this tutorial I'll be going back to Mortal Kombat and drawing one of the big bosses of the fighting game series, Shao Khan.