


1
First start with this oval for Dwayne's face. For his shoulders, draw the horizontal line. Also the red lines representing his arms. Of course, don't forget to bisect this guide with the line vertically slanted line. Draw lightly with your No.2 or H

2
The red crescent outer line is a placement for the crown of Dwayne's head. The crescent line inside his face represents his hairline. The a) line is for his eyebrows, b) line for his eyes, c) line for his nose, d) line for his mouth, and e) the curve

3
Draw in lightly his eyebrows and eyes. Compare to where they fall on the lines. Also check your drawing to see if it matches for accuracy.

4
Now draw lightly the wrinkles on his forehead, his nose, and mouth. Don't forget the crease at the side of his nose & mouth.

5
Lightly sketch in his hair with dots, ear, jaw, neck, and shoulder. Take your time to draw in the bull tattoo he's so famous for and his cross.

6
At this point draw in the rest of his arm and left side of torso. Don't forget his ribs, belt, and pants.

7
Here is the fun part, that is drawing his mighty pecs and Scorpion King tattoo. Gotta love it! Make sure you get the folds of his abs! This man is the architect of a fit body. Warning! Don't become impatient. That is your enemy. Take your time and fo

8
Even if your picture doesn't look like this drawing, don't worry. We all have learning curves and I want to congratulate you on completing this tutorial thus far. Those of you who would like to continue, you know what to expect... a full pencil drawi

9
At this point, you can erase your guideline and see if your picture looks similar.

10
The picture that goes with this step shows two different ways to hold your pencil to acquire certain effects. OVERHAND: Holding a sharpened pencil in normal writing form with fingers in the middle or near the lead gives you great control and thin/det

11
PENCIL STROKES & TONE, SHADING, TEXTURE -- For your convenience, I have inserted this step with different pencils, strokes to use. And you can study the shapes that make up this drawing universe, along with tone, shading, and texture.

12
TOOLS! I'm introducing the grid again. It's a great way to transfer the picture onto your paper with accuracy and speed, much like this tutorial's picture. Draw the square grids on your ref picture printout (they could be one inch squares). Count how
13
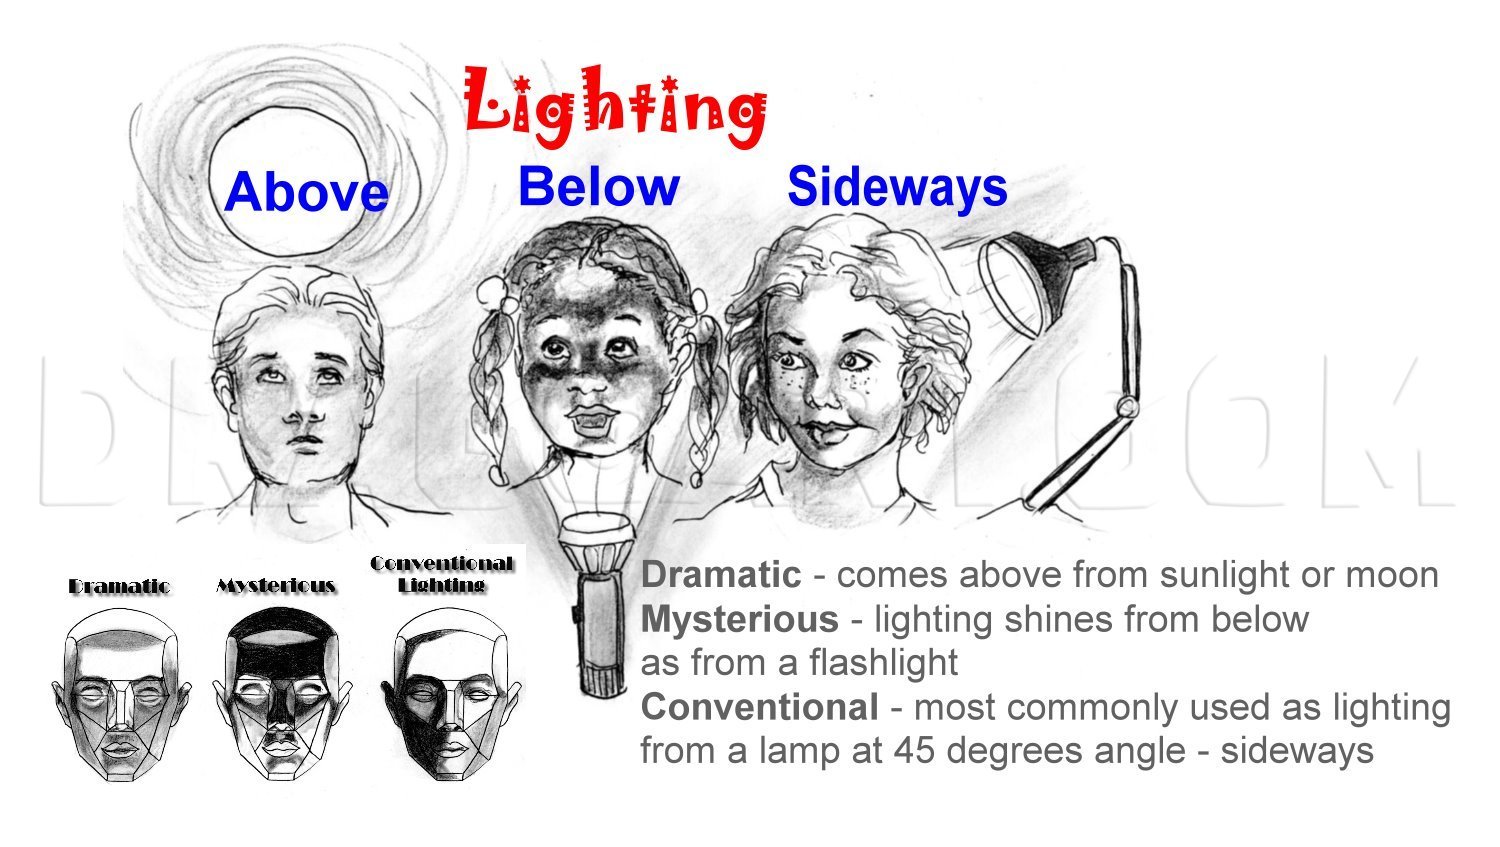
Dwayne's picture was taken with conventional lighting. Click on the LIGHTING picture for different ways to show off your subject.

14
This is the first start. This is where you would sketch in small circles or lines to shade the areas. It would take hours upon hours to cover all that area with a pencil. I chose to shade with pastels. To build my confidence, I blended and applied th

15
This second application, I went ahead and applied more pastel with no blend. In a few strokes I've got area coverage. Applied light medium gray to face. Looks like a mess. That's how a beginning project will appear. Keep patience with you and keep ap

16

17
To get those tone transitional, squint your eyes and stand further from your picture. You'll notice there are areas you need to deepen. First, added more dark pastels (black) to the tattoo and his shoulder. Then added dark gray to his pecs. I took th

18
I'm still looking at my reference pic to match tone and likeness. Here I used my blending stump to "draw" in more lines, add more shading to his beard, eyebrows, and side of face. I used my 5mm fine mechanical pencil to dot areas near his jaw line, n

19
When I shaded his tattoo to match the picture with my 9B Graphite Pencil and some dark gray pastels, the "S" and Dial Pattern did not smudge. So that workable fixative really helps out a lot. I also shaded the background with dark pastel gray and som

20
have to say this...OH, I'M SO SATISFIED WITH THIS... how about you? This was one heck of a drawing experience. I can't believe the details that went into getting the dark skin tone. But it was well worth the hours spent.

21
This picture gives you some techniques on how to get the tattoo looking realistic. To help out with specific areas of highlights, tone, texture, etc., the next two following steps will show you.

22
Without highlights, your picture would have a flat appearance. Click on this picture to learn how to make your own picture POP out!

23
Click on this picture to see how Tone, Shading, Texture, and Reflective Light affects Dwayne Johnson, who is a brilliant actor and wrestler! HERE'S A TINY BONUS. The next 2 steps has a humorous face drawing of Dwayne "The Rock" Johnson!

24
If you want to draw this, click on this picture for the seven steps. PIC 1: Draw in guidelines: a) eyebrows, b) eyes, c) nose, d) mouth. PIC 2: Draw in eyes & eyebrows. PIC 3: Add nose & mouth. PIC 4: Draw in cheeks, chin, and ears. PIC 5: Draw in ha
Comments 0
Details
March 2, 2012
Description: Dwayne Douglas Johnson (born May 2, 1972) is also known by his ring name The Rock. He is an American actor and professional wrestler, widely considered one of the greatest professional wrestlers of all time. He won a total of 16 championships in WWF/E and my heart too. He reminds me so much of how my dad looked, especially in the face. But what I love the most about him is his cheerful, comedic, stoic, and intelligent demeanor. Oh, and is he an architect of his body. This tutorial is in honor of this beyond handsome man and his excellent build. The picture is of his role as Scorpion King movies. Trust me, I couldn't pass this up. I'm hoping you're unable to pass up this tutorial too (I was going to make it advanced, but I think Intermediate will do). I've got a some extra bonuses in here just because he looks so much like my late father. Please fav, vote, and comment. Thank you all. Peace and love to you.


