


1
Sketch the curve for the cloudy top of the tornado and diagonal line that represents its vortex. Lightly draw this with a No.2 or HB pencil. Make sure you draw it as seen in the picture.

2
Sketch lightly the two parallel red lines for the cloud mass over the horizon.

3
Now draw in the diagonal vertical red lines for wind direction of the clouds (this guides you to stroke in your clouds in the direction of the wind). At the horizon is the dark stretch of landmass. Represent this by drawing the last horizontal red li

4
Now draw in the tornado's vortex.

5
Lightly sketch in the clouds at the top of the tornado. Draw in those little puffy, circular lines. Notice how those hanging clouds (maybe studs) are at the same slant as the vortex.

6
Observe where the next line of clouds go in relation to the guidelines. Draw in those squiggly lines. NOTE: You can exercise freedom in drawing this, but stay close to the slanted direction of those hilly lines.

7
Here is another fun part of the drawing. Draw in the two horizontal red lines for the two cloud bellies. Also add in your landmass, staying close to your guidelines. Don't forget those tiny power lines. Use squiggly lines in the slanted direction of

8
I made this line drawing especially for you if you don't want to do the pencil shading and blending part. Otherwise, let us continue to the pencil drawing part.

9
Here is the outline done with a 0.7mm mechanical pencil. Look closely and see if your lines look something like this. You can erase if certain areas like the eyes or nose don't line up. Take you kneaded eraser and dab off the shadow outlines or dark

10
TOOLS! I'm introducing the grid. It's a great way to transfer the picture to an outline onto your paper with accuracy and speed. Draw the square grids on your ref picture printout (they could be one inch squares). Count how many in the column and row

11
Click on this picture to check out information and a couple of other websites on tornadoes.
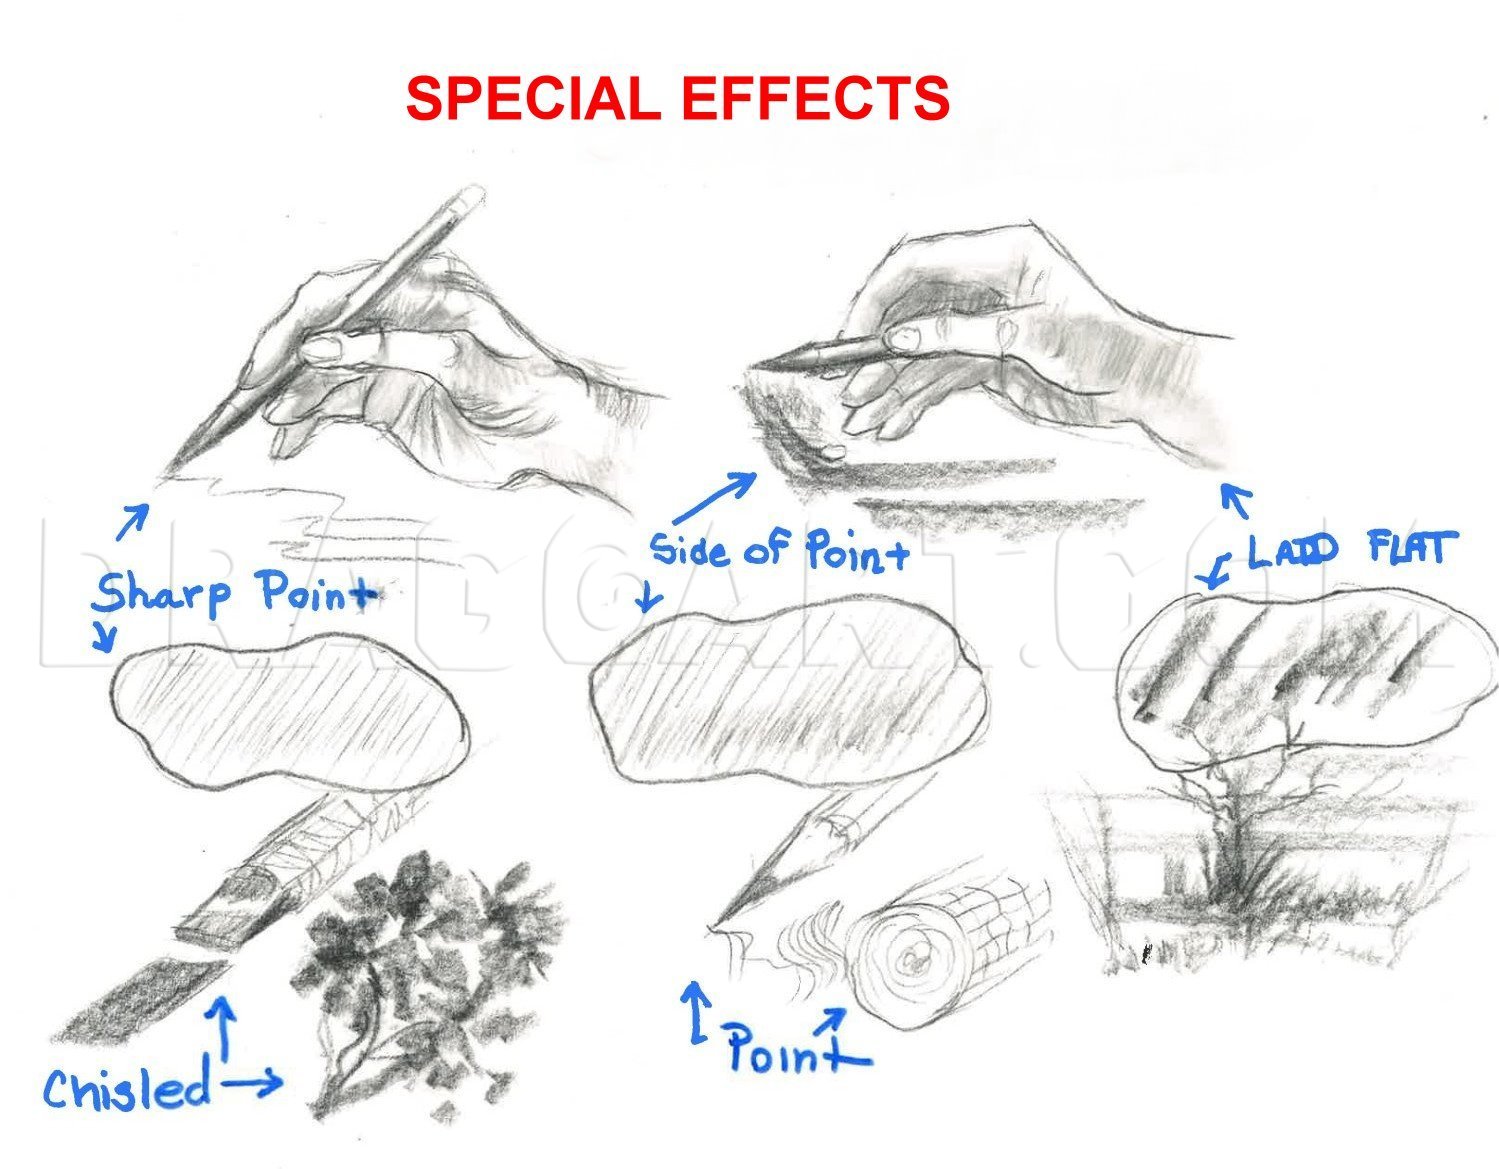
12
Special Effects! How in the world do you create those ominous clouds and tornado? The secret is in how you hold the pencil and the type of pencil's edge, which is explained in the following step. Look at the different effects in this step. Practice t

13
The picture that goes with this step shows two different ways to hold your pencil to acquire certain effects. OVERHAND: Holding a sharpened pencil in normal writing form with fingers in the middle or near the lead gives you great control and thin/det

14
CUBE, BALL, CONE, & CYLINDER -- These are shapes everywhere in nature. It helps to know how to shade, add texture, etc. Recognizing these shapes, simplifies the landscape or subject you're looking at. TONE, SHADING, SHADOW, & TEXTURE -- Tone is the a

15
You can use your rubber kneaded eraser for reflective lights on the sides of the tornado's vortex, within the cloud formations catching lights of the sun, or to enhance the horizon. Remember that the reflective light area isn't pure white--it is at m

16
The picture here is a great exercise for value shading. I've got a little secret tip for you to make things easier. You can download this to your desktop. First click on the picture to have access to full size. By right clicking on your mouse, you ca

17
After printing out a number of the above template, practice shading in the values like this picture. You become familiar with this shading technique that gives you more control and confidence.

18
*TIP: Before I forget, I want to say this. For more realism and smooth transitional between the shadowed planes and highlights, I lighten the outlines so they'll be hardly visible. Now On with this step. This is the first start with the pastel applic

19
Here I used my blending stump to "draw" in more lines and add more shading to clouds, tornado and landmass. I worked in circular motions on the side of my blending stump (underhand). I with the lined walls of the clouds, sometimes sweeping up the dir

20
I sketched in more shading in tornado and clouds with my 9B graphite and 0.7mm mechanical pencils. I defined the shadowed cloud areas by looking at the reference picture closely. The sketching was done in circular and diagonal lines, staying close to

21
I did this pencil blending separate so you can see the difference after the application. I used, of course, my blending stump. I was able to carry the graphite to smooth out lighter areas to appear darker. Graphite lines and smudges are not recogniza

22
Finally, the storm has passed over. I have finally FINISHED!!! With my white and light gray pastels I added more highlights to the clouds. And, yes, I darkened that bad baby of a tornado. They can be beautiful, but the are dangerous and cause fatalit

23
Without highlights, your picture would have a flat appearance. Click on this picture to learn how to make your own picture POP out!

24
Click on this picture to see how Tone, Shading, Texture, and Reflective Light affects this tornado. The tornado normally rides on the edge of a storm cloud. That's why lots of time the sun can be seen behind it. Check out Wikipedia & those other webs
Comments 0
Details
July 14, 2012
Description: I have had nightmares about tornadoes since I was a child. Now I have the honor to do this tutorial called "How to Draw a Realistic Tornado. In one of my steps, I have more information about this phenomena with website links. But here's what I found in Wikipedia's vast knowledge on the subject by googling tornadoes. A tornado is a violently rotating column of air that is in contact with both the surface of the earth and a cumulonimbus cloud or, in rare cases, the base of a cumulus cloud. They are often referred to as twisters or cyclones. Tornadoes come in many shapes and sizes, but they are typically in the form of a visible condensation funnel, whose narrow end touches the earth and is often encircled by a cloud of debris and dust. Most tornadoes have wind speeds less than 110 miles per hour (177 km/h), are about 250 feet (76 m) across, and travel a few miles (several kilometers) before dissipating. The most extreme tornadoes can attain wind speeds of more than 300 miles per hour (483 km/h), stretch more than two miles (3.2 km) across, and stay on the ground for dozens of miles (more than 100 km). (Wikipedia Notes) I hope you enjoy this tutorial. Please fav, show your love, and comment. Thank you all. Peace and love to you.


