1
For this hawk drawing we only need a basic outline of the head and beak, and a slightly more detailed outline of the eye to start with. I usually draw the outlines of my drawings using the grid technique (see my Ferrari tutorial), but a lot of peo

2
Alter the eye to make it more oval shaped and add the detail to the right corner as shown. Draw the bottom of the beak and altered jaw line as shown.

3
Add a nostril and some of the structures of the beak. You also need to make the eye slightly pinched at the bottom and add some more detail around the right side. And that is all there is to the outline - it's pretty basic! The drawing is really buil

4
Begin by shading three irregular shapes on the face of the beak, as shown. Note how the shapes are separated by thin areas of blank paper – these will serve as highlights later on. Also shade the patterns of the lower beak, as shown. Start to shade

5
Smooth out the blocks of shading on the beak with a tissue, cotton pad or Q-tip (NOT your finger!). Before you start the detail of the eye in this step, quickly scroll down and look at the eye at a later stage of the drawing so you get an idea of wh

6
Now we start to draw the detail of the beak over the areas you shaded in the previous step. In the upper half there are stripes that follow the 3D shape of the beak, and in the lower half there are sharp, angular shapes. I can’t really explain how

7
Suddenly the beak looks very complicated, but really not much has changed from the previous step. The nostril has been defined and some shading has been added around it and the top of the beak. Some more shading has been added directly below the nost

8
Smooth out the patches of ‘sketchy’ shading on the beak and add a bit more shading here and there so that the beak looks less patchy, but still retains the detail of the pattern. In this step we also begin to draw the rest of the face. Begin by

9
When drawing the iris of the eye (the lighter section surrounding the pupil), draw it in two stages – (1) first draw the medium tone to form the base layer, then (2) draw the iris details – these include a bunch of slightly jagged ring-like segme

10
Now we begin to draw the eyebrow/eye socket structure. In the previous steps, I have been slowly adding some of the eye socket details, so look back over them if you missed these details. Now we are going to add the shadows in this area and this is r

11
We now need to start to draw the feathers that cover the top of the head. I know that these feathers look very difficult to draw, but with the right technique and some patience, they aren’t that hard. First, take a look at the finished drawing to g

12
This shows how to get the general texture of the feathers. Steps 1-4 involve simply involve drawing a feather shape, shading it and then drawing some lines across it to give it a ‘feathery’ texture. Steps 5-7 show the same, but with a new bunch o

13
Step 9 involves the addition of more lines. Repeat steps 8 and 9 until you get a texture you are happy with. Step 10 is the important step. Draw thin lines from the upper border of the white channels between the feathers as shown. This gives the feat

14
So I can’t really show you how to draw the feathers individually as it will take too long, but with the techniques I have explained above, you should be able to draw it yourself. You do NOT have to draw it exactly as I have done either – I actual

15
Towards the back of the head the feathers become less detailed - just shade some jigsaw-like shapes as I have done. Note how the feather details directly above the eye socket are short and arranged in rows. This is another area where you can do your

16
This step is about adding highlights to the feathers. Recall step 10 from the feather technique guide a few steps ago – that’s what we're doing here. Erase patches of the white channels between the feather clumps to widen them slightly and to cle

17
Now apply steps 10-13 of the feather technique to the patches you erased. As you can see, the addition of crisp feathered edges really gives the drawing depth.

18
Complete the feather texture for the feathers on the back of the head. Also note how the feather details above the eye socket have progressed over the last few steps. Another thing that has been progressing over the last few steps are the feathers t

19
This is the general technique to drawing the feathers to the left of the eye – make sure you use a sharp pencil! Step 1 involves drawing the base layer which consists of lightly-drawn curved lines. Note how the lines do not extend across the entire

20
In this step the middle of the face gets some attention. You can see how the feather texture from the left of the eye has curved under the eye and ended in the middle of the face (this is actually where it begins I guess – we have drawn it in rever

21
In the previous step I started to draw the base layer of shading for the dark feathers under the face/around the neck of the hawk, the progress of which you can see here.

22
Here is the technique I used to draw this patch of feathers. Step 2 involves drawing very short and jagged, V-shaped bunches of lines. Note how they are evenly dispersed with gaps between them. Step 3 involves drawing slightly longer and darker lines
23
As you are drawing the patch of dark feathers, you should also start to fill in the feathers that extend around the back of the neck and head. We can now start to see the final shape of the drawing. Fill in the feathers at the back of the head – th

24
Here’s how to develop the area below the mouth/beak. It is quite a light and fluffy texture that is bordered at the bottom by jagged, darker feathers. This is a pretty straightforward aspect of the hawk to draw, so just follow the steps.

25
Sketch lines over the shaded feather-shapes at the back of the head to develop the texture. Note how I have varied the strength of the lines amongst these feathers to give a bit of variety to the area. The idea is to make the feathers look streaky an
Comments 0
Details
August 2, 2013
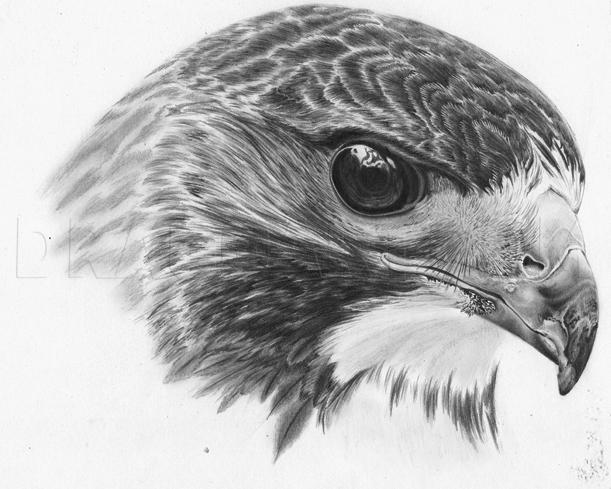
Description: Welcome to this tutorial on how to draw a realistic hawk. This is a complex tutorial with many steps which may be too advanced for novice artists; however, don't let that stop you from giving it your best shot as it will help you develop a wide range of drawing skills. You will need a sheet of smooth paper, cotton buds/tissues, HB through 4B pencils, a good eraser and a sharpener for this tutorial.