Art
Battles
Live
News
Contest
Contact Us
Join
Login
Battles
Tutorials
Art
News
Live
Contest
Contact Us
Privacy Policy
Login
Join
Welcome to DragoArt 💖🔑
Login
or
Join
How to Sketch a Wolf, Arctic Wolf
Artist:
finalprodigy
/ March 22, 2013
Step 1.
I used charcoal pencils for these sketches. You can still follow along using regular graphite pencils and substituting an eraser for white charcoal. I used HB charcoal for general sketching, 2B charcoal for dark shading, and white charcoal for highli
ghts.
more
I used charcoal pencils for these sketches. You can still follow along using regular graphite pencils and substituting an eraser for white charcoal. I used HB charcoal for general sketching, 2B charcoal for dark shading, and white charcoal for highlights.
Step 2.
As with all drawings, start off with basic shapes and guidelines before moving on to more complex details. I've always found starting with a circle and then building around it to be the easiest way to start most of my drawings. An HB charcoal pencil
was used for this sketch.
more
As with all drawings, start off with basic shapes and guidelines before moving on to more complex details. I've always found starting with a circle and then building around it to be the easiest way to start most of my drawings. An HB charcoal pencil was used for this sketch.
Step 3.
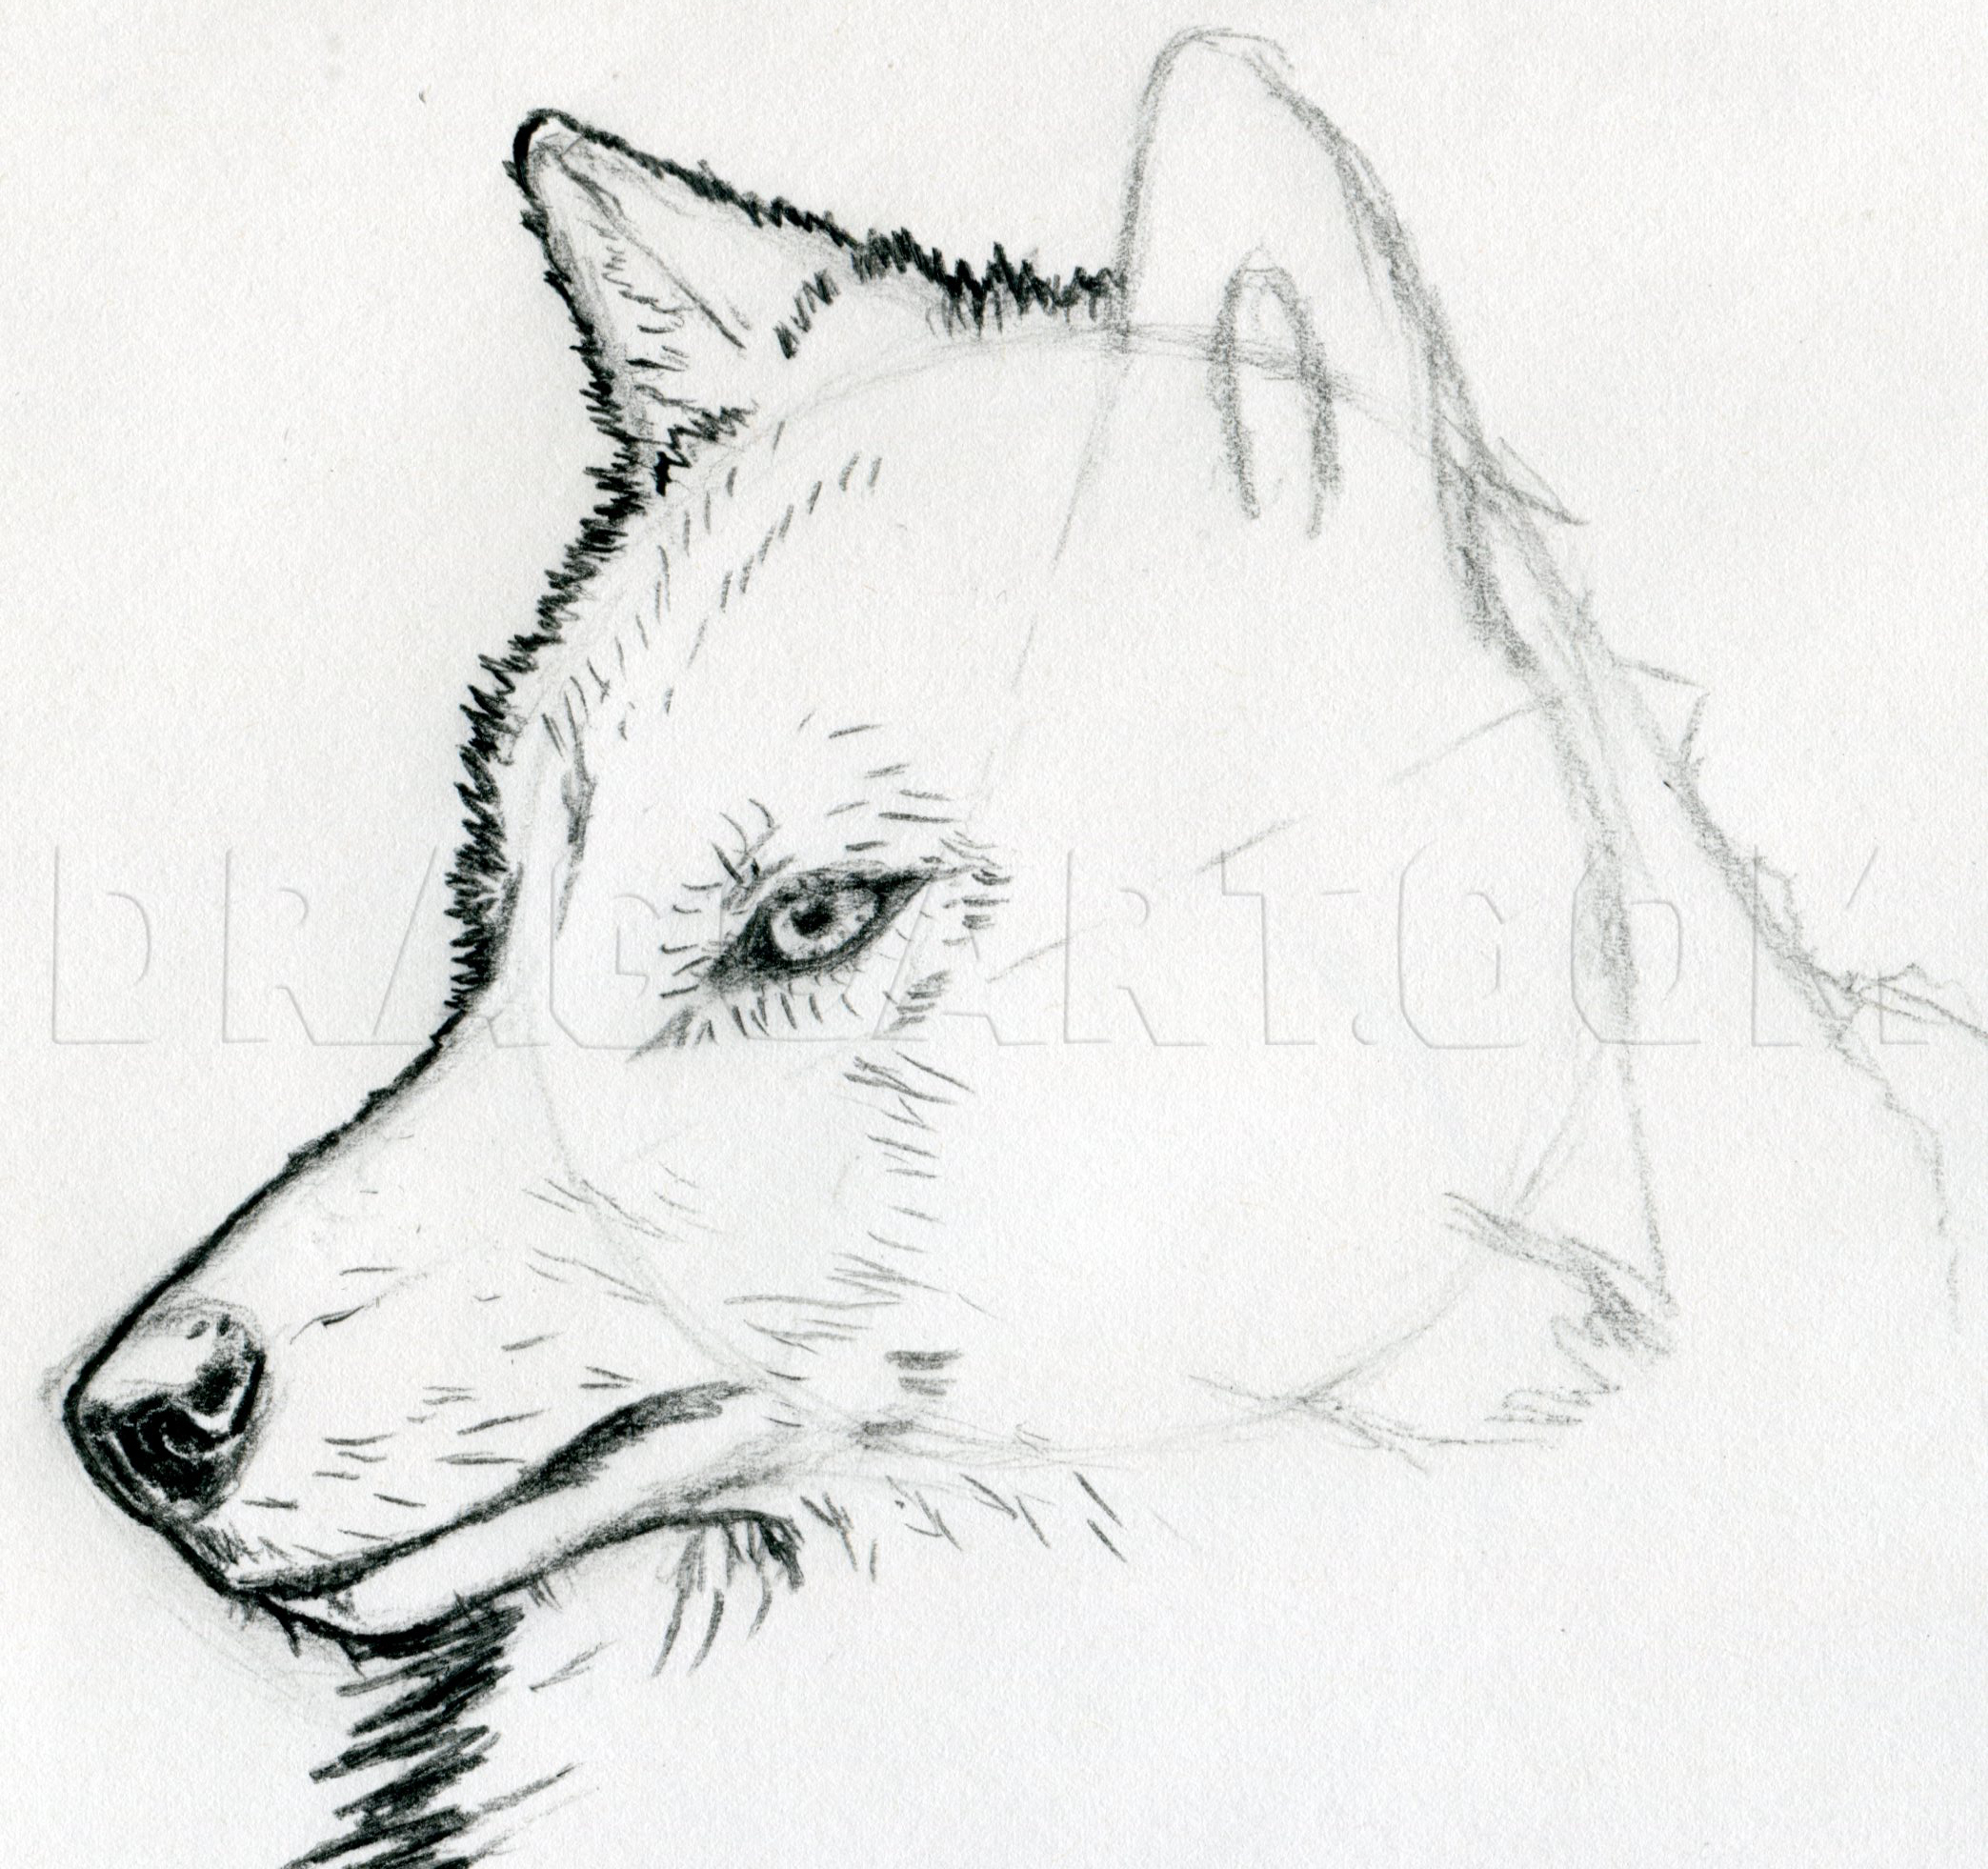
Lightly sketch in some basic features. Sketch in the eye, nose, mouth and develop the ears and fur outlines a bit.
Step 4.
Starting with the top left quadrant of the drawing, start using bolder lines to define the wolf. Make your lines as confident and crisp as you can. Don't overdo it with the details.
Step 5.
Move down to the bottom left side of the drawing. Define the wolf's muzzle and fur.
Step 6.
Define the rest of the wolf. Try to erase or at least lighten any unneeded guidelines. You can call this sketch done here or even color it if you so chose.
Step 7.
I went ahead and lightly and roughly shaded over my sketch using soft willow charcoal. An equivalent to this would be to roughly shade over the drawing using HB charcoal.
Step 8.
After smoothing out my shading using a bit of paper towel, I quickly and roughly erased in a few highlights. I went over some of my darker lines again with HB charcoal before calling this sketch done.
Step 9.
Alright, time for the more complicated sketch. So, if you are anything like me you probably struggle with full body drawings of people and animals. I've found that the easiest way to draw a semi proportional/proportional figure is to start my sketchi
ng in the head then adding the rest of the body. Start this sketch by lightly drawing in basic shapes and guidelines. I again used an HB charcoal pencil to sketch.
more
Alright, time for the more complicated sketch. So, if you are anything like me you probably struggle with full body drawings of people and animals. I've found that the easiest way to draw a semi proportional/proportional figure is to start my sketching in the head then adding the rest of the body. Start this sketch by lightly drawing in basic shapes and guidelines. I again used an HB charcoal pencil to sketch.
Step 10.
Now roughly sketch in the features of the wolf's head. Nothing needs to be perfect here. You just need a starting point that will help you with future proportions.
Step 11.
lightly and roughly sketch in the basic forms for the rest of the wolf and the rock that it is resting on. Keep in mind that none of these guidelines are permanent. They are just there to give you an idea of where everything is going to go.
Step 12.
Move back to the head and start using bold, crisp lines to define the head. Follow the same procedure that you did for the previous sketch.
Step 13.
Start working your way down the wolf's torso with you sketching. Try to define the front legs a bit more. You can also define the background/rock a bit more.
Step 14.
Define the front legs and the rest of the torso. I left the guidelines un-erased for the most part just to show how the forms were built around them. You can erase you guidelines as you move along, though.
Step 15.
Finish sketching in the rest of the wolf/drawing. If you are using the same shading technique that I am using then don't worry too much about making your lines perfect and erasing every little extra line, that will all take care of itself in the next
steps.
more
Finish sketching in the rest of the wolf/drawing. If you are using the same shading technique that I am using then don't worry too much about making your lines perfect and erasing every little extra line, that will all take care of itself in the next steps.
Step 16.
Here I used a stick of 2B charcoal to lightly/roughly sketch over my drawing. You can use softer charcoal (4B, 6B) if you would like.
Step 17.
Smooth over you drawing now using some paper towel or a soft cloth. This will greatly lighten your previous lines but it will also get rid of your guidelines, for the most part.
Step 18.
Now it's time for the fun part! Using white charcoal is almost like painting or coloring with pastels. Remember that the more layers of white charcoal you put down, the brighter the white will be. So for you first layer you'll want to lightly go over
an area to more or less blend in the charcoal and the add a second layer of more refined lines. I Decided to start shading from the top of the drawing and work my way downward.
more
Now it's time for the fun part! Using white charcoal is almost like painting or coloring with pastels. Remember that the more layers of white charcoal you put down, the brighter the white will be. So for you first layer you'll want to lightly go over an area to more or less blend in the charcoal and the add a second layer of more refined lines. I Decided to start shading from the top of the drawing and work my way downward.
Step 19.
Here I using an HB charcoal pencil do go over the eyes, nose, ears, and the wolf's outline again. I also added another layer of 2B shading to the background.
Step 20.
By adding a bit of white charcoal to the background and then blending it into the dark charcoal using a blending stump, I managed to smooth it out a bit. I then extended the rough 2B shading to the bottom left portion of the sketch. I added the first
layer of white charcoal to the torso fur and the front legs. Remember to shade very lightly with this first layer.
more
By adding a bit of white charcoal to the background and then blending it into the dark charcoal using a blending stump, I managed to smooth it out a bit. I then extended the rough 2B shading to the bottom left portion of the sketch. I added the first layer of white charcoal to the torso fur and the front legs. Remember to shade very lightly with this first layer.
Step 21.
Define the left side of the drawing. I first went over the wolf with another more refined layer of white charcoal shading. I then redefined, the wolf's outline using an HB charcoal pencil. I added a bit of white charcoal to the rocks and then blended
it into the darker charcoal. You may need to add more layers of 2B charcoal to make it smoother and darker.
more
Define the left side of the drawing. I first went over the wolf with another more refined layer of white charcoal shading. I then redefined, the wolf's outline using an HB charcoal pencil. I added a bit of white charcoal to the rocks and then blended it into the darker charcoal. You may need to add more layers of 2B charcoal to make it smoother and darker.
Step 22.
Add a layer of white shading to the rest of the wolf and add some 2B charcoal to the background.
Step 23.
Finish up your sketch by adding in a layer of white to the rest of the wolf and then redefining its outline with an HB charcoal pencil. Then smooth out your shading with a blending stump. You could carry this sketch much further by making you backgro
und a lot smoother and adding more details to the wolf but as far as sketches go, I would call this one done here. As always, leave any comments or questions below!
more
Finish up your sketch by adding in a layer of white to the rest of the wolf and then redefining its outline with an HB charcoal pencil. Then smooth out your shading with a blending stump. You could carry this sketch much further by making you background a lot smoother and adding more details to the wolf but as far as sketches go, I would call this one done here. As always, leave any comments or questions below!
Comments (0)
More From
finalprodigy
Mature Content
Mature Content
Mature Content
Mature Content
Mature Content
Mature Content
Mature Content
Mature Content
Mature Content
Mature Content
Mature Content
Mature Content
Related
Mature Content
Mature Content
Mature Content
Mature Content
Mature Content
Mature Content
Mature Content
Mature Content
Mature Content
Mature Content
Mature Content
Mature Content
Details
Artist:
finalprodigy
Date Added:
March 22, 2013
Steps:
23
Favorited:
57
(view)
Views:
0 in last hour, 5 in last day, 40 in last week, 111434 total
Comments:
0
Tags:
how to draw a wolf
,
how to draw realistic
,
how to sketch
,
how to sketch animals
Description:
Hey everyone, this tutorial will show you how to sketch an arctic wolf, one of my favorite types of wolves. I hop you have as much fun with this drawing as I did!
X
Login
Username
Password
Remember Me
I forgot my password
X
Leaving Dragoart for External Site
We temporarily stopped you from leaving Dragoart so you could confirm
The site above is not affiliated with Dragoart in any way. Please continue at your own risk. Don't enter any passwords or personal information from a site claiming to be Dragoart or its affiliates.
X
Flag Content
Report
sexual
violence
copyright
spam
Details (Optional)
X
Flagged Content
Loading...
X
Members that favorited
Loading...
X
Contest Submission Form
Loading...
X
Battle Challenge
Loading...
X
Battle Challenge Details
Loading...