Alright everyone, your first step is to use the Mapping Out Basic Shapes Method. If you're traditionally drawing, make sure to draw very lightly. If you're using a computer, use a thin pencil tool and put your opacity to light. Also, use layers on a computer for every step you do. Use a circle to base out the shape of the characters head. To points like the neck, shoulders, or anything like joint points, its best to mark a small circle there or something else; whatever you're comfortable with! Everyone maps out different. Now, while you do this, try seeing where the neck goes and how wide the characters body is. (Remember to portion everything decently. This is only a sketch, it doesn't need to be perfect, but it needs to be something you can understand later.)
Step 2.
Now, around your map out you need to draw your character. Use the map out you used before to make your second map out. This will show you what to outline later. Remember, this still needs to be light, but not as light as the last map out so you can s
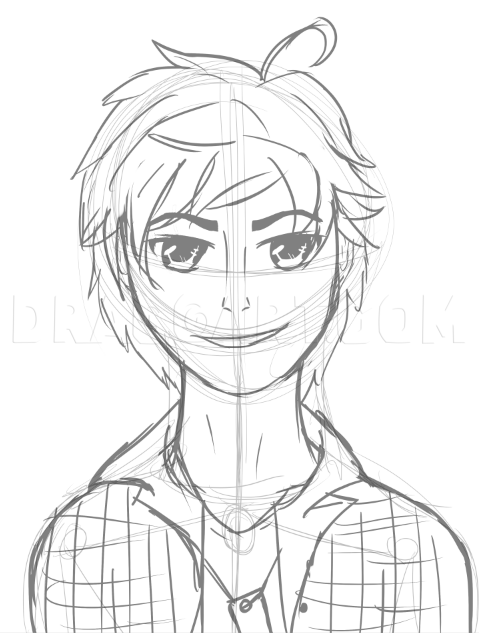
ee what to outline. A good thing to do now is use a REFERENCE. Look at drawings online, or even mine! Inspire yourself. Draw yourself, draw a character, draw my own drawing! (But please do not post it or take credit for it.) Remember to erase the last outline you did so it wont be so messy.
Step 3.
Next step is to outline your drawing! For thicker places like eyes and eyebrows, use thicker tools. (Not too thick, don't make them pop too much.) For thinner things such as skin and hair, use thinner outlining tools. (Be careful with thin and thick tools, they can get messy real quick! But it's totally worth it.) For clothing, it's optional. I like making everything thin so it's less messy, but it's up to you! Black is the color most people use to outline. It's a lot easier. I don't have any tips on colored outlining. Sorry! When outlining, be sure to use anything besides a pencil so its much more bolder and when you color you can actually see what you did. (Also, don't forget to erase your map out!)
Step 4.
(REMEMBER: YOU DON'T NEED TO DO THIS IN ORDER EXCEPT FOR THE SHADING AND LIGHTING PART. ) Now, color everything separate. If you're using a computer, use layers. If you're using traditional, try splitting everything up into different parts. The first part is skin. Now, if your person is white, make sure to put more red tints into their skin. (Cheeks, neck, nose; any place where the most blood is. Sounds disgusting yeah, but it looks good.) If your person is tan, give it minor red tinting. (I'm tan myself, so I barely have any red tinting on me but it is noticeable.) If your person is black, they probably wont have much red tinting. Now before I get a rampage of comments; no I'm not being racist OK? Describing someone's skin color isn't racism unless I actually said something offensive to that race. I'm just saying their skin color, it's not that bad.
Step 5.
Now to color the eyes! There's not much to do in this step. But a good way to color eyes is to use that color and slowly blend it into dark and lighter versions of it. It makes the eyes look very cool. For my eyes, I made them very bright. Remember to contrast ok? The pale skin with bright eyes makes the drawing less messy.
Step 6.
Next, you need to color the hair! Like I said about contrast, the pale skin goes well with the bright hair. This doesn't mean you have to have this all the time. Experiment! Try to see what you can do with colors! But contrast always works, it makes everything less crazy. Also if you're going to do a mix of colors like me, make sure they look like highlights instead of colors everywhere.
Step 7.
Now, you want to do the clothing! Guess what I'm going to say? You can use contrast if you want this time. This doesn't matter as much. Just try not to use too many tacky colors. Match the colors on your characters personality! Like I love plaid, a lot. Like it's not even funny. I also love wearing dog tags so I gave my character a dog tag and a plaid shirt. By the way, the shirts suppose to look bent to represent wrinkles.
Step 8.
Now you need to shade! Identify where shadows will fall on your character. Will they be on the left? On the right? On the front? You decide! Being me I typically shadow on the left. I'm not sure why but I do. Now, shadow where places stand out. For example, the sides of noses and ears are always shaded. Areas like the neck are shaded. Wrinkles on clothing are shaded too. Any places where something overlaps or is bigger than the other is shaded.
Step 9.
Now to add lighting! This overlaps shadowing most of the time. Lighting can be anywhere too like shading. In this picture, I imagined as if light was shiny towards them, so any open areas in the middle of them were brightened. Now this picture might not have much of a difference, but if you shade it'll help a lot. It shows where points are bigger than the other too and where the light shines most on. It makes your picture pop out more and gives it a nice touch.
Step 10.
Lastly, add your background! Now there's a few things you can do with a background. You can put a contrast to it. I put a colorful background against a more pale person. The outfit and skin color are a perfect balance from the bright background. The hair and eyes do throw it off a little, but the black behind the circles kind of make it better. Now the background shouldn't be too eye catchy in certain situations. A background should never be plain red. It brings more attention on the background than the character. Black is also typically used but it could mess up the outline concept of the picture (if you used black). Like I did make a mistake by making colors vibrant, but I did make the background black and make some colors dull. By the way, I avoided the whole outlining with black and adding a black background flaw by putting colors around the outline. When you're done with the background, add your watermark! If you're not familiar with what that is, it's basically your signature or your symbol of showing you drew this. I also add dates to mine, but you don't need to do that. But you can! Hope you enjoyed my tutorial! This was my first one I ever made, I hope it was helpful! Good luck you amazing artists! :)
Views:
0 in last hour, 2 in last day, 4 in last week, 4624 total
Comments:
0
Tags:
Description:
Hello! This is my first tutorial. By the way if you haven't learned anime drawing style, this tutorial probably wont be for you. But, this will show you how to make a drawing similar to mine in a few steps! (This is my first tutorial, I'm still trying to figure out how to do this.)
We temporarily stopped you from leaving DrawingHub so you could confirm
The site above is not affiliated with DrawingHub in any way. Please continue at your own risk. Don't enter any
passwords or personal information from a site claiming to be DrawingHub or its affiliates.