1
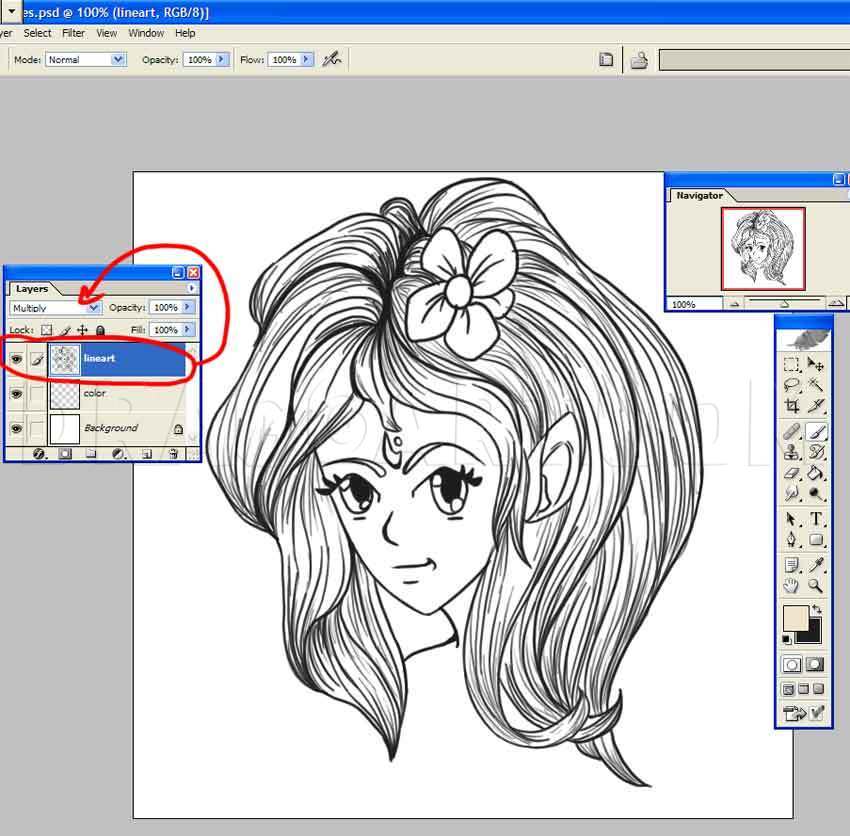
Whip out your lineart and set the layer blend option to 'multiply'. This enables your lineart to be colored on.
2
Create a new layer beneath the lineart layer and call it 'color'. Open the brush settings and choose a size thirteen brush. In this case, I'm coloring a big image, but if you have a smaller image choose a smaller brush. Set your brush settings using
3
Start coloring your image (on your color layer) and try not to go out of the lines. I'm using a wacom tablet to color my anime picture.
5
Now for the shading! Create a new layer on top of the color layer and call it 'shades'. Set that layer (using layer blending options) to 'multiply'. This will darken your color no matter what color you choose. A shortcut to create a new layer is Ctr
6
We must group this layer by clicking Ctrl + G. This will stop you from shading out of the lines. Yay, isn't that a neat trick?!
7
Open up your brush presets again and set it to size 13 soft round. This is will make your shading a soft type. Make sure you set your brush preset to smoothing and shape dynamics.
8
Set your brush opacity to 50% and brush flow to 12%. This is a soft style coloring. So the brush will color nice and soft.
9
On your shade layer, start shading that anime chick! First define your light source. This is important because it supports your image with realism.
10
Now, get out your smudge tool. We're gonna do some smudgin' damage! This is key in Photoshop coloring.
11
Set your smudge settings to Mode: normal Strength: 50%, and brush size: 47%. This will make your smudging much easier.
12
Start softening up your shading. This will make your anime girl's face soft and smooth. See how creamy her face looks?! Make sure you leave some hardness in those shades.
13
Now let's get ready for the highlights. Remember your light source?! Well anyways, make a new layer on top of the shades layer and set the blend mode to screen. Group that layer by pressing ctrl + G. I do this so my highlights won't go out of the lin
14
Start shading her face using the opacity to 100% and brush flow to 12%. Be careful when you highlight because you don't want too much light to her face. It will make her look like a doll.
Comments 0
Details
December 29, 2007
Description: This tutorial will teach you how to color anime manga in Photoshop CS. I use Photoshop CS to color my images. Its my favorite program. This tutorial was based on my lineart from my lineart tutorial. I try my best on drawing anime characters. So I hope she looks a bit like a manga character. I enjoyed doing this coloring tutorial. It took me two hours to color her and make the tutorial. WHOA! I love this dragoart place, its sooooo easy to submit tutorials. I hope this tutorial is helpful to your needs!


