1
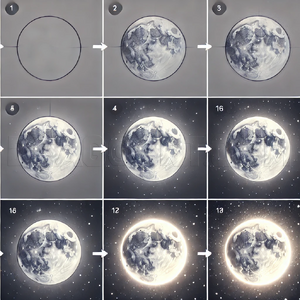
This is just a quick guide that shows you the direction of the phases and which way they face when waning and waxing.

2
Draw the full moon first which is a circle.

3
You will then draw the quarter moon.

4
Next, draw the waxing crescent moon.

5
You will move to the right and draw the quarter moon again.

6
Then finally draw the waning crescent moon. Erase the mistakes or even add the missing phases on both sides.

7
There you have it. The moon phases in steps for you to draw and learn from. Let me know if you liked the lesson folks.
Comments 0
Details
March 13, 2019
Description: Okay guys, I'm back again and sorry for the delay but I had to run out this morning and do some errands. I'm back and ready to upload this lesson on how to draw moon phases, step by step. What I like about this lesson is how the tutorial shows you how to draw the moon in all the changing phases. I have been seeing a lot of poster art and shirts with this particular design. I loved the idea so I decided to go ahead and make my own version on the moon and the phases it goes through every month. Starting from left to right I will tell you the different phases. The crescent shape that faces west is called a waxing crescent, then we have the first quarter, then technically (although not shown), waxing gibbous is next, then the full moon then the waning gibbous, then last quarter, then waning crescent, then full moon. I wanted to keep the lesson pretty simple without too many steps which is why I left out a couple phases. You can 100% add them in if you'd like, but for now you can enjoy drawing moon phases as I have shown for you here. Have fun and enjoy people.