1
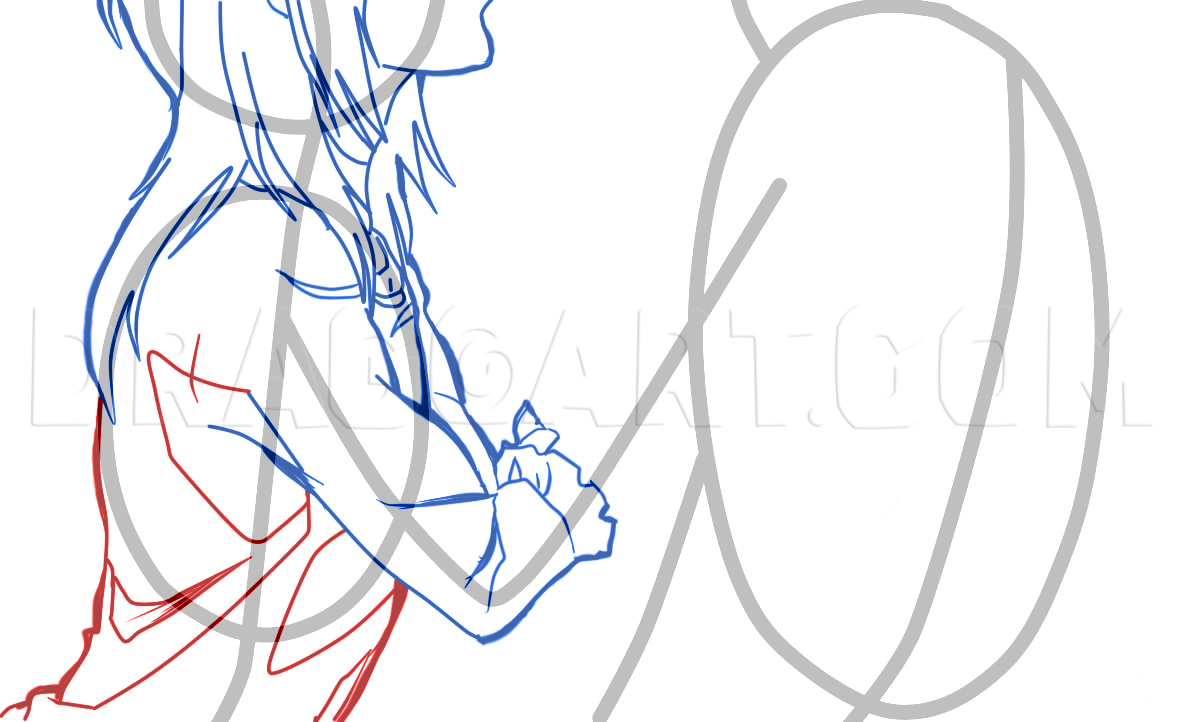
We are taking a shortcut in the guidelines. Draw the first two round shapes (left side) with the long line for Misaki's torso and the check mark that extends from her middle line. Also draw in the large oval to the right with the two lines (arm exten

2
Lightly sketch in her hair. Give a curve to the spiked hair. Observe how the hair falls onto her torso circle guideline and draw it.

3
Draw in her sleeve with ruffles.
4
Stay with the guidelines and draw in the rest of her shirt and apron.

5
Follow the guideline for her arms and draw them in.

6
That little line on Usui's guideline shape was for his shirt collar. Draw that in lightly.

7
Here you get a chance to sketch in his first sleeve, part of shirt, and pocket. Get those folds and wrinkles in.

8
See how Usui's back relates to the guidelines. It's not straight but curves with the round shape. Sketch in his arm covered by the sleeve. Don't forget to add those folds and wrinkles.

9
Your drawing may look like this or you might have your own version. At this point, you can color in your picture with a medium of your choice.

10
If you would like to add some shadow, here is an example to go by.

11
Here is the basic color combination of the Misaki grabbing Usui's shirt. Following this step are tips on sketching/drawing anime clothes.

12
There are 4 fold actions in trousers. These folds originate at the PULL points and radiate to the SUPPORTING SURFACE (SS). H=Radiating from the HIPS. C=Radiating from the CROTCH. B=Radiating from the BUTTOCKS. K=Radiating from the KNEES. Click on the

13
The pants were baggy radiating tons of folds. But this woman's figure has a fitted top. Notice there aren't as many wrinkles. The pull is at the bust and the fold is between. Beneath her chest, the folds are from her waist. The tighter the outfit, th

14
If you ever need to know how suit jacket or jacket folds do with arms up or down, click on this picture for reference.

15
It helps to have an eye for fashion too. It good to draw your figure first, then add the clothes for a natural look. Check out how the clothes appear on these girls!

16
Without lighting, we have a flat subject. That's what makes Usui falling so interesting, dramatic lighting. The red arrows are direction of light. Blue arrows are the shadows him being turned away from the sun. The tail of his shirt flying up by the

17
Here are some helpful tools for doing sketches or drawings. You can use the 0.7mm 2B mechanical pencil, 9B pencil, 9B crayon, tissue, blending stump for excellent lines and blending.

18
Last but not least, I want to show you how great a pencil is. And you can get these same effects with a regular No. 2 pencil. The first picture shows how to hold your pencil for Overhand (great for writing & details) and Underhand (great for shading
Comments 0
Details
January 19, 2013
Description: Can't get enough of Anime. I watched 26 episodes of Kaichou Wa Sama-Maid (School President is a Maid) in 2 days! I said that to say I'm pretty much loving this style of art and drawing it too. Clothes is the subject, which I'll be touch on how to draw wrinkles in the clothes. I'm hoping I can soon get out another Anime tut that touches on faces. In this preview picture Misaki is taking off Usui's shirt. At school, Usui always taunted her to either undress, take off his shirt, or be his personal maid just to see her fuming anger. Well, he gets his wish, but not the way he thought. She's helping out his injury from a fall where he tried to protect her. I said all that to say this...the picture focuses on their clothes. Let me know what you think of this tut by commenting, faving or clicking on "Love It"! And thank you so much for supporting my previous anime tuts! Peace n love to ya!